RelativeLayout布局
上一章学了LinearLayout布局,我更钟情于他的weight(权重属性),等比例划分,对屏幕的自适应有很大帮助,但是一般我们是在外面用LinearLayout布局,里面就不用,因为在外面他可以自适应屏幕,接着就说RelativeLayout.
基本属性
这是我们学LinearLayout遗留下的问题,在LinearLayout用gravity不是我们想的那样去布局,但是relativelayout里面是肯定的。
- gravity:设置容器内组件的对齐方式
- ignoreGravity:设置了该属性为true的属性的组件,将不受gravity属性的影响
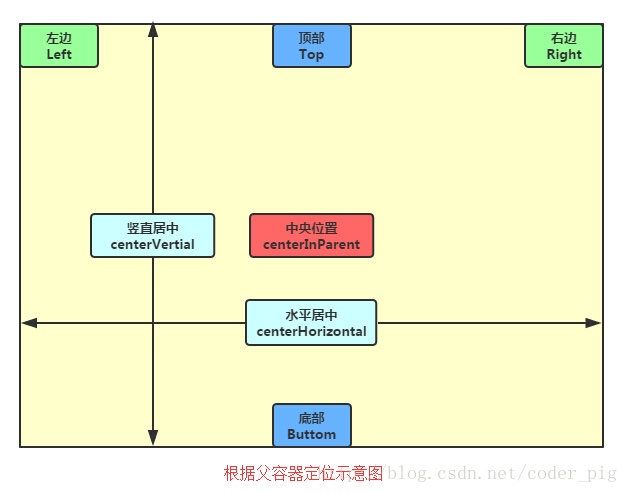
根据父容器定位
- layout_alignParentLeft:左对齐
- layout_alignParentRight:右对齐
- layout_alignParentTop:顶部对齐
- layout_alignParentBottom:底部对齐
- android:layout_centerHorizontal:水平居中
- android:layout_centerVertical:垂直居中
- android:layout_centerInParent:中间位置
根据兄弟组件定位
- layout_toLeftOf:参考组件的左边
- layout_toRightOf:参考组件的右边
- layout_above:参考组件的上方
- layout_below:参考组件的下方
- layout_alignTop:对齐参考组件的上边界
- layout_alignBottom:对齐参考组件的下边界
- layout_alignLeft:对齐参考组件的左边界
- layout_alignRight:对齐参考组件的右边界
margin(偏移)
- layout_margin:设置组件上下左右的偏移量
- layout_marginTop:设置组件离上面的偏移量
- layout_marginBottom:设置组件离下面的偏移量
- layout_marginLeft:设置组件离左边的偏移量
- layout_marginRight:设置组件离右边的偏移量
设置组件内部元素的边距(比如TextView里的字体位置)
- android:padding 往内部元素的上下左右填充一定边距
- paddingLeft:往内部元素的左边填充一定边距
- paddingRight:往内部元素的右边填充一定边距
- paddingTop:往内部元素的上方填充一定边距
- paddingBottom:往内部元素的下方填充一定边距
父容器定位属性示意图
根据兄弟组件定位
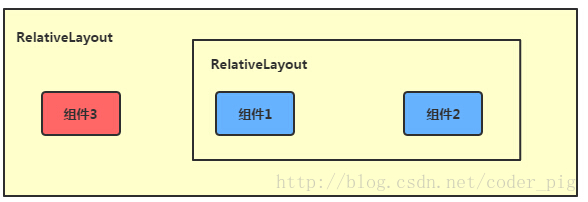
什么是兄弟组件?
所谓的兄弟组件就是处于同一层次容器的组件。
图中的组件1,2就是兄弟组件了,而组件3与组件1或组件2并不是兄弟组件,所以组件3不能通过 组件1或2来进行定位,比如layout_toleftof = “组件1”这样是会报错的梅花布局
1
2
3
4
5
6
7
8
9
10
11
12
13
14
15
16
17
18
19
20
21
22
23
24
25
26
27
28
29
30
31
32
33
34
35
36
37
38
39
40
41
42
43
44
45
46
47
48
49
50
51
52<RelativeLayout xmlns:android="http://schemas.android.com/apk/res/android"
xmlns:tools="http://schemas.android.com/tools"
android:id="@+id/RelativeLayout1"
android:layout_width="match_parent"
android:layout_height="match_parent" >
<!-- 这个是在容器中央的 -->
<ImageView
android:id="@+id/img1"
android:layout_width="80dp"
android:layout_height="80dp"
android:layout_centerInParent="true"
android:src="@drawable/pic1"/>
<!-- 在中间图片的左边 -->
<ImageView
android:id="@+id/img2"
android:layout_width="80dp"
android:layout_height="80dp"
android:layout_toLeftOf="@id/img1"
android:layout_centerVertical="true"
android:src="@drawable/pic2"/>
<!-- 在中间图片的右边 -->
<ImageView
android:id="@+id/img3"
android:layout_width="80dp"
android:layout_height="80dp"
android:layout_toRightOf="@id/img1"
android:layout_centerVertical="true"
android:src="@drawable/pic3"/>
<!-- 在中间图片的上面-->
<ImageView
android:id="@+id/img4"
android:layout_width="80dp"
android:layout_height="80dp"
android:layout_above="@id/img1"
android:layout_centerHorizontal="true"
android:src="@drawable/pic4"/>
<!-- 在中间图片的下面 -->
<ImageView
android:id="@+id/img5"
android:layout_width="80dp"
android:layout_height="80dp"
android:layout_below="@id/img1"
android:layout_centerHorizontal="true"
android:src="@drawable/pic5"/>
</RelativeLayout>
margin与padding的区别
1、首先margin代表的是偏移,比如marginleft = “5dp”表示组件离容器左边缘偏移5dp; 而padding代表的则是填充,而填充的对象针对的是组件中的元素,比如TextView中的文字 比如为TextView设置paddingleft = “5dp”,则是在组件里的元素的左边填充5dp的空间
2、 margin针对的是容器中的组件,而padding针对的是组件中的元素
margin可以设置为负数
1 | <RelativeLayout xmlns:android="http://schemas.android.com/apk/res/android" |